
Yoga Poses to Stretch the Lower Back
- bubeehappy
- Mar 10, 2022
- 5 min read
Updated: Feb 9, 2023
"You are only as young as your spine is flexible." Bob Harper


Does your lower back hurt or feel stiff?
With function changes at work my day turned from fairly active to desk-bound only. I have the luxury of having a raisable desk and buying a memory foam seat-cushion by @everlasting_comfort allows be to change my seating position from regular to crossed-legged or even squatting. The variety helps me to keep the spine moving and not to crouch.
My latest addition is a balance board to motivate me even more to raise my desk as I can keep moving or train my balance.
But I still catch myself getting lower back pain if I don’t move and stretch enough.
Therefore I want to share 4 poses with you that help me a lot.
To mention upfront, the postures should be performed according to your personal ability to do so. The golden rule is 'if it doesn't feel right then don't do it'. None of these poses should inflict pain. If you are experiencing pain, be sure to check in with a medical professional.
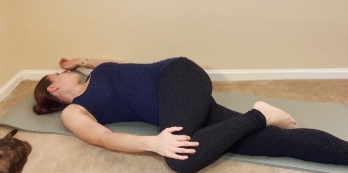
1) Reclined Twist (Supta Matsyendrasana)

Benefits:
Releases the lower back
Opens tight shoulders
Elongates supporting spinal muscles
Improves digestion
Roots the body and quiets the mind
How to do it:
Lie down on your yoga mat with your legs extended and arms by your side. Take a few deep breaths. Once you are ready with your next exhale engage the core and move your left knee up to your chest, placing your hand on the knee. Your shoulders should be relaxed and away from the ears, shoulder blades lying on the mat.
Take a few breaths here or right away with your next exhale guide your knee over your body to the right side of your body. This movement allows your spine to twist. Move with caution and listen carefully to your body. Over time your knee may touch the floor.
As your left knee is on the floor, your right arm is pointing away from your shoulder while being grounded on the mat. Your gaze follows along your arm to your hand.
If you prefer, close your eyes here and stay in this position for a few deep breaths. Recommended are 5-10 breaths.
To release the position, with the next inhale bring your leg back to center and extend.
Now repeat with the opposite side.
Contraindications:
I personally tend to feel a slight resistance when I hit the tight spine spot during the twist. If you feel this also, don't push it. Just breath and let the twist work it's magic. Shortly after I personally feel a slight pop, the tension is released and my body goes further into the twist.
Again don't push it. Listen carefully to your body. If your knee does not touch the ground that is perfectly okay. Trust the process. Over time it might. As Adriene says 'find what feels good'. Listen to what feels right for you. Listen to the sensation.
2) Revolved Head to Knee Pose (Parivrtta Janu Sirsasana)

Benefits:
Lengthens the side body, spine and hamstrings
Opens the hips, groins and shoulders
Stimulates abdominal (e.g. liver, kidneys) and reproductive organs
How to do it:
While sitting down on your yoga mat take a few deep breaths first. Then extend your right leg out and place your left heel by your groin. Both thighbones need to be down on the mat and the right foot flexed upwards.
When ready start with your next inhale to lift and turn your upper body to the lift, with the exhale bend towards your right extended leg. If possible place your right hand inside your right leg, palm facing up.
With an inhale extend your left arm out and with the exhale lean the arm over your ear towards your right foot.
Both thighbones need to remain flush on the mat. Pulling your left shoulder blade back will allow your torso to open towards towards the sky. Hold here for a few breaths.
Once you are ready to release, inhale and lift your left arm and therewith the torso back up.
Now repeat with the opposite side.
Contraindications:
It is not recommended to do this pose if you have neck, shoulder, hip or lower back injuries.
It took me a few tries to be able to touch my foot on the left-hand side and to lay my other arm down on the floor. And I still struggle to do so on the right-hand side.
Be mindful and listen to your body carefully.
3) Spinx or Seal Pose (Salamba Bhujangasana)

Benefits:
Compression and stimulation of sacral-lumbar arch
Tones the spine
If neck dropped back, thyroid will be stimulated
In full Seal Pose, stretch of the stomach
How to do it:
Lie down on your belly with your legs extended and arms by your side. Take a few deep breaths. Once ready with the next exhale place your elbows by your side to prop yourself up with your forearms flat on the mat, parallel to your body - just like a sphinx.
Be mindful to not sink into your shoulders but to push them away from your ears.
Take a few breaths here to feel how your lower back feels. If the sensation is too strong, move your elbows a little bit further ahead bringing your belly further to the ground.
If you feel comfortable with this pose, you can also extend your arms pushing you further up while slightly rotating your hands outward to the side. With locked arms this is the deepest pose variation.
Stay in each pose for a few breaths. As you exhale you may feel a stronger sensation in the lower back.
To come out, lower your chest to the floor, turn your head to one side and rest it on your palms. You may feel the need to further decompress your lower back. In that case you may slide the knee up that is in the direction that you are facing.
Contraindications:
It is not recommended to do this pose if you have a bad back or tight sacrum.
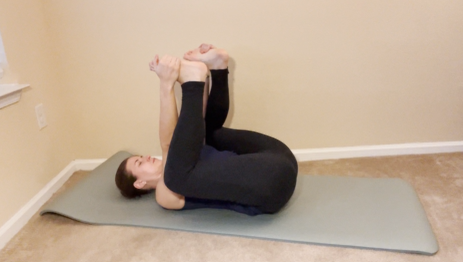
4) Happy Baby Pose (Ananda Balasana)

Benefits:
Opens the hips
Exercises muscles along your back and surrounding your spine
Strengthens chest, bi-/triceps, abdomen, hamstrings, calves, thighs and groins
Massaging the inner organs, improving the digestion
Relieves fatigue
Reduces stiffness in lower back and hip
Relieving back pain
Decompression of sacrum
MAKES YOU HAPPY, BABY! 😎
How to do it:
Lie down on your mat with your legs extended and arms by your side. Take a few deep breaths. Once you are ready flex your left and right leg up and slightly rotate the knees out.
When bending your knee you will be able to hold the big toes or the outer edges of your feet. Activate your arches and make sure your ankles and knees are in a vertical line.
Holding your feet will have your knees push towards your armpits.
Once your are in that position take a few breaths and feel free to explore the sensation. You can roll side to side or front to back to give your back a nice massage.
To release the pose pull your knees onto your chest, giving yourself a big loving hug and then release the feet to the mat.
Contraindications:
It is not recommended to do this pose if you have extremely tight hips, are pregnant or have neck or shoulder injuries.
Information sourcing and inspiration from:
Pose 1) https://www.liveborboleta.com/journal/2017/3/16/featured-pose-supta-matsyendrasana-reclined-twist
Last Note:
If you have any concerns or questions about your health, you should always consult with a physician or other health-care professional. Do not disregard, avoid, or delay obtaining medical or health-related advice from your health-care professional because of something you may have read on this site. The use of any information provided on this site is solely at your own risk.

Comments